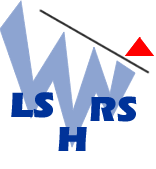
This Formation can appear anywhere in the chart and is made up of the Head, Left Shoulder, and Right Shoulder. There are two types: Top and Bottom.
Head & Shoulders - Top
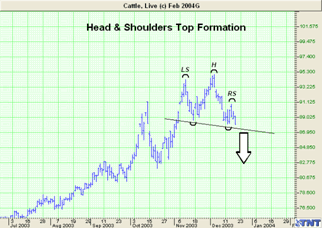
This formation has three definite peaks: the Head, Left Shoulder and Right Shoulder. The middle peak, the Head (H) is higher than either shoulder (LS, RS). This formation anticipates a drop in price below the Neckline (see below).

To Trade a Head & Shoulders - Top:
Place a SELL order on the break of the Neckline. Your stop loss order
should then be placed just above the Head. The stop loss order can also
be placed above the Right Shoulder as a more conservative point.
Example of Head & Shoulders Top in Track 'n Trade Pro:

Head & Shoulders - Bottom
This formation is simply an inverted version of the Head and Shoulders
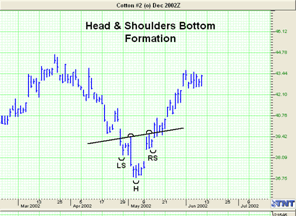
Top formation. Therefore, a Head and Shoulders Bottom anticipates a rise
in price above the Neckline.

To Trade a Head & Shoulders - Bottom:
Place a BUY order on the break up of the Neckline. Then place a stop
loss order just below the Head. The stop loss order can also be placed
below the Right Shoulder as a more conservative point.
Example of Head & Shoulders Bottom in Track 'n Trade Pro:

Head & Shoulders Tool

To identify either a Head & Shoulders Top or Bottom formation, use the
Head & Shoulder tool.
Charting a Head & Shoulders (H&S) Formation:
1. Select the H&S tool from the Charting Toolbar.
2. Position the mouse pointer where you would like to place the Left
Shoulder (LS) point and click to place.
3. Move to the valley point between the LS and the Head, left click to
place.
4. Move to the Head point and click to place.
5. Move to the valley point between the Head and Right Shoulder (RS),
left click to place.
6. Move to the RS point and click to place.
Moving H&S Drawing:
1. Select the H&S drawing by clicking on it.
2. Drag to the new location and release the mouse button to place. Note:
The tool is selected when a line appears connecting LS, H, and RS.
Deleting H&S Drawing:
1. Select the H&S drawing by clicking on it and press the Del(Delete)
Key on your keyboard.
2. Or, right-click on the drawing and select the "Delete" option in the
menu.
Resizing the H&S Drawing:
1. Select the H&S drawing by clicking on it. The drawing is selected
when boxes appear on the corners.
2. Click on one of the boxes to drag the select point and release the
mouse button.
Changing Properties of an H&S Drawing:
Right-click on the drawing to view the Properties menu. Properties that
can be changed are:
Foreground - Changes the line and arc color of the H&S drawing. Note: The line is only seen when the drawing is selected.
Line Thickness - Changes the thickness of the H&S line. Choose values from 1-6.
Line Style - Changes the line style of the H&S line, which shows when the line is selected. Choose from Solid, Dashed, Dotted, and more.
Arc Thickness - Changes the arcs formed at the LS, H, and RS points. Choose values from 1-6.
Font - Changes the Font, Size, Style, and Color of the H, LS, and RS.
Show Text - Select to view or hide the H, LS, and RS.
Send to Back - Changes the layer of the tool. This option is used when more than one tool is in the same area of the chart. Click on "Send to Back" when you need to access.
Back To Top