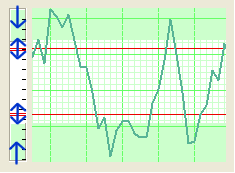
To customize your JBCOT indicator pull up your Program Options screen by clicking on this button on your main Toolbar. Click on the My Default Settings to make changes to the default options on the JBCOT indicator. Click on the "Current Chart Settings" to make changes to the currently opened chart only. In each of these sections, you can click on the JBCOT section.

1. Period: To specify the number of weeks used in calculating the JBCOT Buy/Sell indicator, simply highlight the current number and type in a new value.
2. Style & Color: Trend lines can be displayed as a Solid, Dotted, or None line. Click on the drop down menu to specify the type of line style desired. Next to the drop down menu is the color box, click on this box to open a panel and change the line color.
3. The drop-down menu for Show Buy/Sell Arrows allows you to select either "Always Show Arrows" or "Only When Indicator is Visible" to view the buy/sell signals or "Never Show Arrows" to never see the JBCOT arrows.
4. To display the indicator in the Chart Window, click the check box.
5. Ruler Bar: See the Ruler Bar section below.
6. Preview Window: This window allows you to make changes and preview them before saving them.
7. Click on "Apply to active charts" if you would like to see your selecting settings on all the charts you have open. Click on "Restore Factory Defaults" if you would like to restore original software settings.
8. Help: Information from the manual has been integrated into the software. When clicking on the "Help" button you will get specific documentation based on the location of the button. You may also press F1 on your keyboard to access this information.
Back To Top
Ruler Bar
The Ruler Bar inside the Program Options window for the indicators that are displayed in the Indicator Window, allows user's to create highlighted regions or horizontal lines within the Indicator Window.
To create a highlighted region: Click at either end of the Ruler Bar and drag either up or down to the end point of the region.
To place a line: Click inside the ruler bar and drag the line to the desired point.

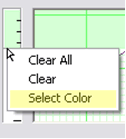
To change the color of the highlighted region: You must right-click on either the bottom edge (if it is on the top of the indicator window) or the top edge (if it is on the bottom of the indicator window). Next choose the "Select Color" option from the right-click menu. The Color Palette will open, choose a color and click on "OK".

You may also "Clear" the item that you right-clicked on or "Clear All" items in the Indicator window by selecting these items from the right-click menu.
Back To Top