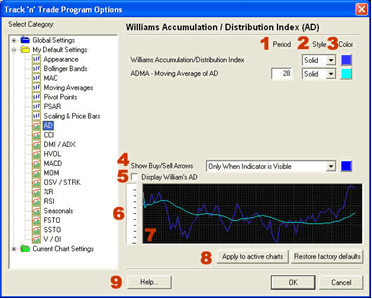
1. Period: To specify the number of days used in calculating the
ADMA Indicator, simply highlight the current number and type in a new
value.
2. Style: The AD indicator lines can be displayed as solid or dotted
lines. Click on the drop down menu to specify the type of line style
desired.
3. Color: Click on the color box and a color panel will open for you
to specify a new color.
4. To display the Buy signal the AD line needs to cross above the
ADMA line, and to display a Sell signal the AD line needs to cross below
the ADMA line. If the ADMA Line Style is None, then the buy/sell arrows
will not be displayed. The drop-down menu for Show Buy/Sell Arrows
allows you to select either "Always Show Arrows" or "Only When Indicator
is Visible" to view the buy/sell signals or "Never Show Arrows" to never
see the AD arrows.
5. To display the indicator in the chart window, click the check
box.
6. Ruler Bar: See the Ruler Bar section at the end of this
chapter.
7. Preview Window: This window will allow you to make changes and
preview them before saving them.
8. Click on "Apply to Active Charts" if you would like to see your
selected settings on all the charts you have open. Click on "Restore
Factory Defaults" if you would like to restore original software
settings.
9. Help: Information from the manual has been integrated into the
software. When clicking on the "Help" button you will get specific
documentation based on the location of the button. You may also press F1
on your keyboard to access this information.
Back To Top |
|