Introduction
The Accounting & Simulator Plug-In enables you to place orders,
deposits, and withdrawals using historical and/or current data. Traders
will find this Plug-In very helpful in getting to know the markets and
testing different trading strategies. This Plug-in also allows you to
play charts forward and backward using VCR style buttons. This is called
simulation.
Requirements
In order to place futures orders or simulate trading using Track 'n
Trade Pro, you will need to purchase the Accounting and Simulator
Plug-In. Call us at 1-800-862-7193 to reach the sales department and
order the plug-in today!
Placing a Futures Order:
Once you have opened a chart using the Commodity tab, you are ready to
place an order. There are two ways in which an order can be placed in
Track 'n Trade Pro: the Order Placement tool, and the Order button in
the My Account window. This section will step you through placing orders
both ways.
Placing an Order using the Accounting Toolbar:
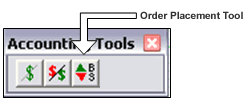
1. Click on the Order Placement tool on the Toolbar.
2. Click and drag your order on the chart until you find your order
point, then release the mouse button. The following window will appear.

3. Fill out the information in the order placement window.
a. In this window, you can specify the brokerage fee
(per side), date order placed, buy or sell, quantity
of contracts, symbol of contact, order type, and you can
change the price on the order. Also, Help options
are available to give instructions on the different
types of orders.
b. When you place an order using the Accounting
Toolbar the screen above will be pre-filled with
default settings. You will not be able to change
the date or the symbol.
4. Click "OK" to place the order, and "Cancel" to dismiss the order
screen.
Placing an order using the Accounting Tab:
1. Click on the Order button in the My Account window:
2. Release the mouse button and the order placement dialogue box will
open:
3. Fill out the information in the Order Placement window.
a. In this window, you can specify the brokerage fee (per side), date
order placed, buy or sell, quantity of contracts, symbol of contact,
order type, and you can change the price on the order.
b. When you place an order using the Accounting tab the screen above
will not be pre-filled and you can change the date and symbol. 4. Click "OK" to place the order, and "Cancel" to dismiss the order
screen.
Editing an Unfilled Order:
1. To edit an order on a chart, right-click on the order and select
Settings to view the order placement window.
2. To edit an order in My Accounts window, right-click on the order and
select "Settings" to view the order placement window.
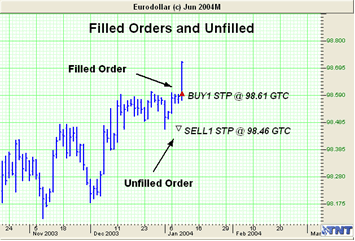
A Filled Order:
When you order is filled, the triangle will fill in red on the chart
(see chart below). In the My Account window, the icon will fill green
and an F will appear after the icon. See My Account Window for more
details.
Example of orders displayed on the Chart:
Placing a Futures Order with a Trailing Stop:
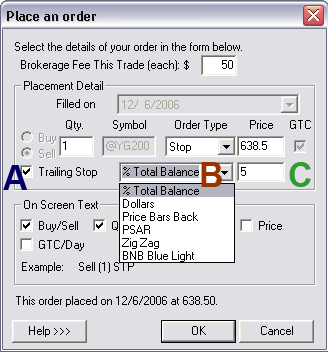
To place an order with a trailing stop first select the box next to
the Trailing Stop option (A).
Then select your desired option for the trailing stop to latch to in the
Trailing Stop Option Drop down menu (B).
You can also edit the value of your selected option in the dialog box at
right of the trailing stop option drop down menu
(C).
There are then 6 Options for setting your
Trailing Stops.
(B)
1. % Total Balance
Example: Lets say your account balance is $10,000 and you would like
your trailing stop to be set at a distance of 10% of your total account
balance from the closing price of each tic. Simply select the %
Total Balance at the trailing stop drop down menu
(B),
and then
enter your desired value value (no
decimals, single digits only), so 10% would be 10 in the value dialog
box. (C)
2. Dollars
Example: If you would like to set your trailing stop loss order to
be set at a specific dollar amount away from the closing tic price
simply select the Dollars option from the trailing
stop drop down menu (B),
and then
enter your desired value dollar value
(no decimals, dollar increments only) into the value dialog box.
(C)
3. Price Bars Back
Example: If you would like to set your trailing stop loss to the
value of a specific number of price bars back from the closing tic price
simply select the Price Bars Back option from the trailing
stop drop down menu (B),
and then
enter your desired number of price
bars back (no decimals, single tic increments only) into the value
dialog box. (C)
4. PSAR
Example:
If you would like your trailing stop to latch to the settings of
your Parabolic Stop and Reversal Settings
(PSAR) select the
PSAR option from the trailing stop drop down
menu (B)
when the PSAR trailing stop
option is selected the value box
(C)
will be grayed out
since it will retrieve the values from your current settings for your
PSAR.
5. Zig Zag
Example:
If you would like your trailing stop to latch to the settings of
your
Zig Zag tool
settings select the Zig Zag option from the
trailing stop drop down menu (B)
when the Zig Zag
trailing stop option is selected the value box
(C)
will be grayed out
since it will retrieve the values from your current settings for your
Zig Zag Tool.
6. BNB Blue Light
Example:
If you would like your trailing stop to latch to the settings of
your
BNB Blue Light
tool settings select the BNB Blue Light option from
the trailing stop drop down menu (B)
when the BNB Blue light
trailing stop option is selected the value box
(C)
will be grayed out since it will retrieve the values from your current
settings for your BNB Blue Light expansion pack.
Back To Top |
|